Wednesday, December 29, 2010

Thanks for Caring -- Sneak Peak from Occasions Mini

The new Thanks for Caring stamp set from the upcoming Occasions Mini (starts Jan. 4) is a wonderful stamp set for sympathy cards, thinking about you cards and thank you cards. The fonts are gorgeous and the butterfly and flower are awesome images. It contains 6 stamps total. This is a card I made for a friend who recently lost her beloved grandmother. I used Perfect Plum paper and the new Concord Grape ink (love that color!). This time I am showing the inside of my card because I was so happy with how it turned out. Enjoy!

Thursday, December 23, 2010

Occasions Sneak Peak -- Take a Spin


Today is my son's 17th birthday. I realized I need to make a card for him. Teenagers are tough to figure out what to make for them. After a little thought, I remembered I ordered the Take a Spin stamp set with my preorder from the new, upcoming Occasions Mini. I am going to make another birthday card using another stamp from this set for my daughter's 7th birthday (next week), so watch for another post soon. This is really a fun set and I am anxious for the new Occasions Mini to come out. I also used the Upsy Daisy stamp set for the "You're" and the 2 1/2" circle punch to punch out the circle. The Tasteful Trim die was used for the zig-zag border. Enjoy! Contact me if you want an Occasions Mini or Sale-A-Bration brochure!

Sunday, December 19, 2010

Sneak Peak -- Valentine Defined & Framed Tulips


Here's a sneak peak of some upcoming products from the Occasions Mini which becomes available to order from January 4th. The images are stamped from the the new stamp set "Valentine Defined". If you noticed the frame around the card on the pink cardstock, it is made with the new textured embossing folder, "Framed Tulips". I also used satin ribbon and hemp thread to attach the greeting "Love You" which was also stamped from the new stamp set "Valentine Defined". The image was punched out with the small oval punch. Enjoy!

Monday, December 13, 2010

Reindeer Poop Recipe Card

Here's a really unique, neat way to use that owl punch...use him to make a reindeer! This is a recipe card for Reindeer Poop (homemade). The reindeer is made from all the parts of the owl punch! Love that owl even more now!

Saturday, December 11, 2010

Punch Art


Look at the fun things we made at my upline's home (Lisa) in Topeka last night. Lisa found these on the interent (without a lot of instructions) and we had so much fun making them! They stand up like cones and make a wonderful Christmas decoration. All supplies used to make these come from Stampin' Up. Start out by cutting squares 3 3/4" x 3 3/4" and made a score line diagonal through the middle of your squares. Emboss the squares using the petals a plenty or northern frost embossing folder. The squares are lined up at an angle and attached together using sticky strip. The rest is just punch art using various punches. Enjoy! P.S. If anyone wants more explicit instruction, contact me through my email.

Friday, December 10, 2010

Northern Hearts


Northern Hearts is a one of the current hostess sets you can earn for free right now. It is found in the Holiday mini. Besides Christmas, I believe it could be used for an anniversary card also. I used real red ink and garden green ink. I stamped the background using craft white ink. The sentiment is from the Contempo Christmas set. I also used some of our new tinsel to decorate it up. Enjoy!

Thursday, December 2, 2010

Holiday Happiness

I am finally back to getting some crafting done. The craft fair and the Thanksgiving holiday kept me busy! This was a fun card to make. I used the new stamp set Holiday Happiness (available in clear mount 120792 and wood mount 120786). I used Old Olive, Cherry Cobbler, Always Artichoke and Elegant Eggplant ink. The sentiment was stamped with Cherry Cobbler and then punched out with the new decorative label punch (120907). I used the new Always Artichoke seam binding ribbon (love it!) 121000 and the new Big Designer Buttons Deck the Halls 121002. The corners were punched with the scallop trim border punch (118870). Oh, and the designer series paper is Jolly Holiday (117159). Enjoy!

Saturday, November 27, 2010

Stampin' Up Window Sheets


Stampin' Up Window Sheets make for wonderful cards and boxes. This card was created using a medium window sheet. I have used the heavy window sheets to make boxes. Stazon or craft ink can be used to stamp on the sheet so the image will not smear. Recently I made several clear boxes and filled them with tags. I simply tied a bow on the top and they turned out very elegant looking. Snowflakes were stamped in the craft white ink on this card. Enjoy!

Thursday, November 18, 2010

Santa Box


Need a reason to get the Big Shot for Christmas this year? How about this adorable Santa box! It is made with the Fancy Favor box die (115965) and the new Tasteful Trim die (120893). The new glimmer brads were used for the eyes and nose. Enjoy!

Tuesday, November 16, 2010

Got Merry?

Fun holiday gifts and treats are a cinch with the new stamp set Got Treats (available in both clear mount and wood mount) and the new Mini Milk Carton die cut! This little milk carton was so easy to make. I filled it with Hershey's miniatures and added a clip and a bow tied with old olive ribbon. Enjoy! All products are available in the big catalog.

Saturday, November 13, 2010

Merry & Bright Christmas Tag


Here's a Christmas tag I copied from the new December issue of Stampin' Success. It was fun to make. Stamp sets used are Bright Christmas and Paisley Prints (both can be found in the Holiday mini and are available in both clear mount and wood mount). I also used the two tags Bigz die, Polka Dot embossing folder and extra large scallop circle punch. Topped it off with a new sparkle brad. All supplies are from Stampin' Up and can be found in the big catalog. Colors used were real red and pear pizzazz. Enjoy!

Friday, November 12, 2010

Wellness Wishes


I am on a roll this afternoon of making cards. I had several I needed to send out and since it is such a dreary rainy day, I can't think of anything better to do. This is a card I made for my husband's uncle, who just underwent surgery. We hope to visit him soon. I used the Wellness Wishes stamp set. I got this set for free last year during Sale-A-Bration. During Sale-A-Bration a person can earn free stamp sets for every $50 they spend. I am hopeful this set will be available again this year. So, watch out for the new, upcoming Sale-A-Bration brochure. I will post as soon as I can in January. This set can be found in the big catalog and is available now. It contains three sentiments for those who are sick. Makes great get well soon cards. Enjoy!

Because I Care


This is card I made this afternoon for a friend who is undergoing cancer treatments. The sentiment Because I Care were exactly the words I was looking for. This is a Hostess Level 1 stamp set. By hosting a workshop or joining our monthly technique club (which starts in January) you can earn this set for free. It is a beautiful awesome set. This card honestly took me less than 5 minutes to make. I also used the top note die to cut out the shape. For the flower, I dipped the top half in Lavender Lace ink which is now retired and bottom half in Wild Wasabi ink and then stamped! So easy and quick. This card says it all. Enjoy!

Always Elegant Anniverary


Always Elegant is one of those beautiful elegant and yet fun stamp sets. It is very economical and is available in clear mount 120477 and wood mount 116976. Is used it to make an anniversary card for my brother and sister-in-law. I used a blender pen with the chalks to color in some tiny spots. The Teeny Tiny Wishes stamp set (115370) was used for the sentiment. I used the scallop trim border (118402) for the corners. I used Elegant Soiree DSP (117163) which is one of my new favorite paper packs. For finishing touches, I added white ribbon and spritzed my card with Vanilla Shimmer Smooch Spritz (118772). A couple of pearls completed the card. Enjoy!

Northern Flurry Thank You


I made this card as a customer thank you. It's a pretty simple card, but the Northern Flurry embossing folder (120902) really adds to it and makes it look a lot more complicated than it really was. After embossing with cardstock with the embossing folder I just added a few basic rhinestones (119246) to the snowflake centers. The sentiment was used from the Thank You Kindly stamp set (111700) and punched out using our new Decorative Label punch (120907). I added some bashful blue ribbon and I'm done! Enjoy!

Tuesday, November 9, 2010

More craft fair items...Santa's Suites


My son Kyle stayed home yesterday with a stomach ache. After awhile he felt better and was bored. So, I put him to work! He loves doing crafty things. I showed him a picture of these Santa Suites made online using gum packages. We couldn't find the right size gum packages, so I had purchased several Cracker Jack boxes instead. He took the images and ran with it on his own! These were made using various size punches of circles and squares. He also used The Tearing Edge SU sells. I think he did an awesome job! I will definitely have to give him commission on these!

Christmas Design A House


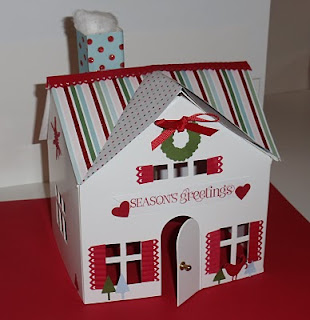
These new Design A Houses's by SU are awesome! They are so easy to put together and decorate. I am going to have my Girls' Club members make them in December. The houses come all white and in 4 pieces (and a chimney). The pieces are very sturdy. I used sticky strip on the taps to put it together. The houses come with patterns which make it easy to cut out paper to cover the house. (I only covered the roof and left the rest of the house white). I used my Itty Bitty Punches to make the wreath and hearts. Also used my crimper and heart border punch for the shutters and I used the sizzlit die Merry Details for the trees, snowflakes and bird. I also used Curly Cute for the Season's Greetings message on the house. My daughter added a cotton ball for the chimney. I thought later about adding some tinsel to the house. Put it on my bookcase and have received many compliments. (The price can't be beat either. They sell for only $6.95.) Enjoy! P.S. It also came with the door handle!

Monday, November 8, 2010

Friday, November 5, 2010

Now Dasher!


Here is a card tally and place setting I made for my mother-in-law. I made 8 of each of these for her to use at an upcoming Christmas card party she is hosting. The card folds and on the inside is a tally chart for the ladies to keep track of their score. The square place setting has a clear window sheet on top and this is what the ladies will set their drinks on. She wanted me to make her something "special" for her Christmas meeting. I used the Dasher stamp set (116816) and added some basic rhinestones to the antlers. I used early espresso and real red cardstock. I also used the Big Shot to cut out the circle and scallop circle. The designer series paper is now retired but I thought it was perfect for this occasion. She was delighted to see these after I finished them. There were pretty simple to make. For me, the hardest part is always deciding actually what to make! Enjoy!

Craft Show Items


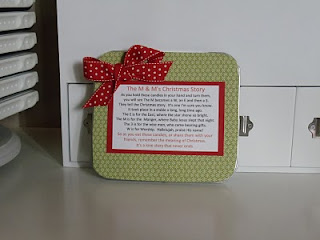
I will be displaying items at an upcoming Craft Fair in Seneca, KS on Sunday, Nov. 21. Here are a few of my creations I will have for sale on that day. All use Stampin' Up products. I plan to have M & M Christmas tins, domino pins and ornaments, tags, reindeer poop, santa's suite, and other things. I will have specials too! If you are in the Seneca area, stop by! It runs from 8 to around 3.

Friday, October 29, 2010

Baby Bundle


Here's a baby card I made today for a teacher who just had her baby girl. I used the new stamp set Baby Bundle (wood mount118525, clear mount 120576). I love using the clear mount with this new stamp set. It makes it so easy to line up where I want to stamp something, like putting the baby in the baby carriage. This is a great stamp set for those needing a stamp set to make baby cards or baby shower cards. It would also be great to use on scrapbook pages. I also used the curvy verses stamp set for the verse on the front of my card and the circle scallop and circles Big Shot dies. Enjoy!

Thursday, October 28, 2010

Spooky Treats!


I have to admit that I was a little skeptical about the new candy wrapper Big L Die (available in the new holiday mini #120809). I purchased it so I can make treats for the upcoming craft fair I am going to be at in Seneca on Sunday, Nov. 21st. I was amazed at how easy and simple it was to use. I made these treats for my daughter's Halloween party at school. It only requires one cut with the Big Shot and a tiny bit of adhesive to keep it together after it is folded. It makes wonderful creases so it folds very quickly. I used the stamp set Wicked Cool (wood mount 118738 and clear mount 120600) to stamp "Spooky". I then punched it out with the large oval punch while my daughter punched out the bats with the new bat punch. I used an assortment of ribbon to tie the ends. So easy and cute! FYI...in case you are wondering, I put a couple of Hershey's miniatures in each one. Two to three will fit in each wrapper. Happy Halloween!!!

Monday, October 25, 2010

Autumn Days and Kinds Thanks

Here is a thank you note I made for a wonderful friend who let me bring my daughter's Girls Club out to her farm. She has a lot of "country animals" including turkeys, donkeys, chickens and exotic pheasant. The pheasant were gorgeous! Autumn Days was the perfect stamp set to use for a thank you note to her. The Thank You Kindly stamp set was used for the sentiment. Enjoy!

Friday, October 22, 2010

Welcome Christmas and Notably Ornate

This is a wonderful card made by a fellow demo and friend Kathy Nace. Thank you for sharing this card with me! It uses two new stamp sets: Welcome Christmas and Notably Ornate. Both are found in the new catty. She also used Cherry Cobbler, Basic Black and the DSP Newsprint! Enjoy

On a Pedestal

Stampin' Up's Two-Step Stampin' sets are awesome for using images to layer like this one, On a Pedestal (wood mount 113814). I used a red marker for the cherry on top and Basic Rhinestone Jewels (119246) to outline the Pedestal. Colors I used were Chocolate Chip and Regal Rose. Enjoy!

Friday, October 15, 2010

Trendy Trees


This is a nice card which can be used for almost any occasion. Another fellow friend and SU demo Deloris Carroll made this. It uses the stamp set Trendy Trees and who can resist a stamp set with trees! My daughter loves these little trees. I think this is a very elegant card and could be used to send to either a female or male. She used the scallop border punch and black and white gingham ribbon (with I think is now retired SU). The stamp set Trendy Trees is a 2 steppin' stamp set can be found in the catalog is a surefire winner!

Thursday, October 14, 2010

Vintage Vogue


Here's a simple, but elegant card to send to any friend for any occasion. I, along with a couple of friends, recently attended a swap at my upline's home. (So much FUN!) Anyway, my friend really likes Vintage Vogue and doesn't have this stamp set yet, so she came over and borrowed it. We had a lot of fun coming up with this card. The new Elegant Lines embossing folder was used for the background. The scallop trim border was also used. Vintage Vogue is a gorgeous stamp set and can be used so many different ways. It is available in wood mount 117690 and clear mount 118598. Colors used were Regal Rose, Crumb Cake and So Saffron. Enjoy!

Grateful for Falling Leaves


Falling Leaves is a stamp set I added to my collection last year and I was so glad to see it again in the new catalog. I love it not only for cards, but also for scrapbook pages. It is available in wood mount (115368). This was a fun card to make. I used my circle and square punches to make the design and I love how it turned out. Colors used were Rich Razzleberry, Old Olive, Dusty Durango (now retired) and Crush Curry (now retired). Enjoy!

Tuesday, October 12, 2010

Autumn Days and On Your Birthday

I love the colors of fall and I especially enjoyed making this card. I am planning on giving it to my mother-in-law for her birthday which is in November. I cased the idea for this card from Karen Leveille (another SU demo). I saw it on Stampin' Connection. She used a different sentiment on her card, but the idea and colors are very similar. Colors I used were Early Espresso, Cajun Craze, More Mustard, Old Olive, and Pear Pizazz. And, I don't want to forget...the stamp sets I used were Autumn Days (clear mount 120000 and wood mount 115452) and On Your Birthday (wood mount 111664). Enjoy and happy fall!

Friday, October 8, 2010

Party This Way!

This was a fun page to create. I did case it from another Stampin' Up demonstrator (I am sorry, I don't remember who.) It uses the new Tasteful Trim Bigz die. I used a 6 X 12 sheet of Real Red, Pacific Point and Old Olive card stock and ran them through the Big Shot using the Tasteful Trim die. I used all the strips on both pages of Bashful Blue card stock. I also used the Party This Way and Sweet Shoppe Alphabet stamp sets for my banner to spell out "Happy Birthday". I stamped the balloons and signs "Party this Way" with the Party this Way stamp set and cut them out for my page. Can't wait to add pictures of my son Kyle's last birthday. Enjoy!

Saturday, September 25, 2010

Trick or Treat

Here's just a simple scrapbook page displaying some photos of my son when he was little dressed up for Halloween. I used new products from SU: the new trick or treat letterpress plate, the new Nite Owl designer series paper, the new spider web embossing folder and the new bat punch. Also used a pumpkin button and a few basic rhinestones. (All from SU.) I plan to add his age and date to this page with the word window punch. Enjoy!

Happy Fall Y'All!

I had so much today playing with new stuff. The Day of Gratitude stamp set is growing on me a lot. I used it on these fall layout pages along with the new Autumn Spice Designer Series Paper. Another new tool that I cannot live without now that I have it is the new Bigz XL die Tasteful Trim. It is fantastic for making borders on scrapbook pages. I simply can't put it down! I also used the new Decorative Label punch. All products can be found in the Fall-Winter mini. I also used another new favorite stamp set from the new big book....Broadsheet Alphabet. Love the letters! I used them to spell out "Fall Fun". I used new colors Early Espresso and Cajun Craze along with More Mustard. On the bottom layout, I cut out my letters using the Billboard Decorative Strip Die. Thanks for looking! Enjoy!


Friday, September 24, 2010

Love Letter and Notably Ornate


I was so excited to finally be able to scrapbook these prom photos of my son and his girlfriend. When I spotted the Love Letter DSP, I knew I had finally found what I was looking for. Sara loves the color red and anything Vintage, so I know she will love these pages too. I used Love Letter (117162) and Notably Ornate (clear mount 120561 and wood mount 117098). I also used my new favorite Big Shot Die....the new Bigz XL Die Tasteful Trim ( 120893). I know this die is going to see a ton of use on my scrapbook pages. It cuts the perfect borders for 12 x 12 scrapbook pages. Love it! I also used the Timeless Type letters and the Naturally Serif dies to cut out my letters and numbers. Scallop Heart of Hearts was used to make the awesome polka dot heart. Thanks for viewing and enjoy!

Wednesday, September 22, 2010

Rejoicing in Christmas


Rejoicing in Christmas showcases the true meaning of Christmas. It is elegant and classic and makes for a really simple, easy card. It is available in clear mount 121139 or wood mount 120829 and can be found the new Holiday mini catalog. I also used Old Olive and Riding Hood Red cardstock along with Soft Suede ink. I inked the star in Daffodil Yellow and cut it out and popped it up with a Stampin' Dimensional. The scallop edge punch was used. I also used Very Vanilla ribbon. I love how this card turned out!

A Cute Christmas and Candy Cane Designer Series Paper


Another fun, playful stamp set from the fall-winter mini is A Cute Christmas. It would be great to make tags, Christmas cards and use on scrapbook pages. (I watercolored in my image using a blender pen and my water color crayons.) I used Candy Cane Designer Series Paper along with Garden Green and Real Red cardstock. I also used another favorite new product from the mini, Northern Frost Decorative Strip. It can be used to cut out 8 unique snowflakes using the Big Shot. I adorned my snowflakes with some of the new sparkle brads which can also be found in the holiday mini. If you need a copy of the holiday mini, contact me.